


We recently had a strange scenario where I needed to confirm a customer's shopify log in credentials in order to "transfer" their account to an internal system in the most seamless way possible. Not to get into too many implementation details but the crux of the issue was:
"How do we confirm the Shopify authentication credentials so the user doesn't have to be forced into a reset password experience on the first login?"
That question put me right in the middle of the Shopify API madness. They have two flavors of APIs, Rest and GraphQL, and both have a lot of overlap, different rate-limiting and it isn't a fun place. I enjoy working with APIs but I think this is way more complicated than it needs to be! That being said there is one api, Customer Access Token Create, that accepts an email and password and returns a token so this shouldn't be so difficult.
I live in the .NET world and there is no official Shopify SDK for us. Yep, you read that right, no Shopify SDK for C# even though it is a top 5 programming language by popularity. They redirect you to SharpShopify which I am appreciative of but even the owner of that repo in the readme states that he only works on functionality that he prioritizes for his projects which is great for him but not for Shopify holistically. ShopifySharp does not have support for this API. Let's get started.
I know there are some GraphQL libraries but I am going to get this done using a plain old HttpClient since for my case I only need to make this one call to this API and don't want to introduce extra dependencies just for this.
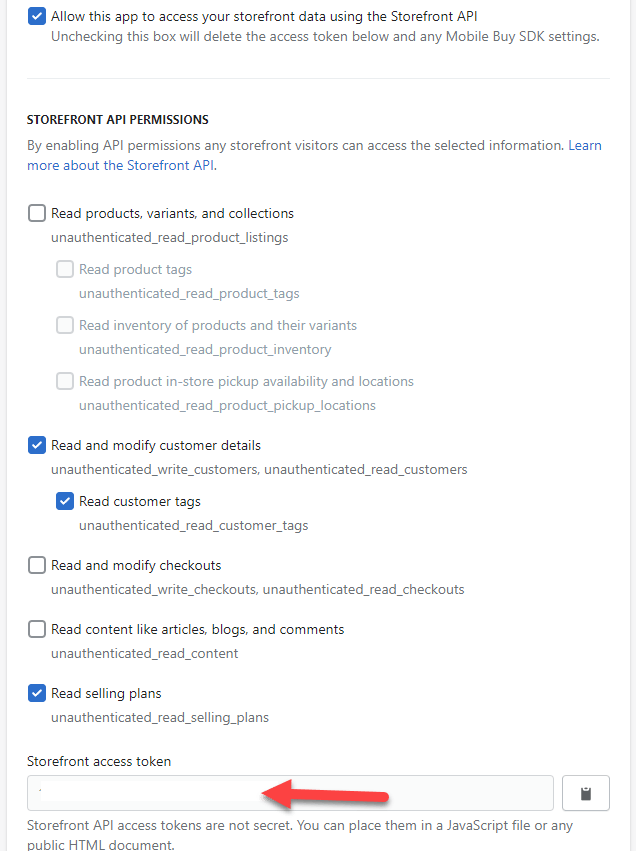
What you'll need to do first is create a private shopify app and allow it access to storefront data so that you have a Storefront access token with scope read and modify customer details. Save the storefront access token at the bottom as we will need to push that into a request header.
Next, I like to look at the return result. This is the return data from the API so we can use the Paste from Json in Visual Studio or an online tool like QuickType to easily model this response class.
{
    "data": {
        "customerAccessTokenCreate": {
            "customerAccessToken": {
                "accessToken": "thebigaccesstoken",
                "expiresAt": "2022-03-11T12:35:41Z"
            },
            "customerUserErrors": []
        }
    }
}

// Paste as JSON classes by visual studio which is why the weird casing

    public class CustomerAccessTokenCreateResponse
    {
       // Added this to easily confirm if it is authorized or not
        public bool IsAuthorized { get
            {
                return !String.IsNullOrEmpty(data?.customerAccessTokenCreate?.customerAccessToken?.accessToken);
            }
        }
        public Data? data { get; set; }
    }

    public class Data
    {
        public CustomerAccessTokenCreate? customerAccessTokenCreate { get; set; }
    }

    public class CustomerAccessTokenCreate
    {
        public CustomerAccessToken? customerAccessToken { get; set; }
        public object[]? customerUserErrors { get; set; }
    }

    public class CustomerAccessToken
    {
        public string? accessToken { get; set; }
        public DateTime expiresAt { get; set; }
    }
Next, I will use Postman to see how the call needs to work and they have a graphql type. Once you get it working here it is simple to port it over to C# and if you use RestSharp they'll even generate all the code for you (same for other platforms/languages like Node/etc).
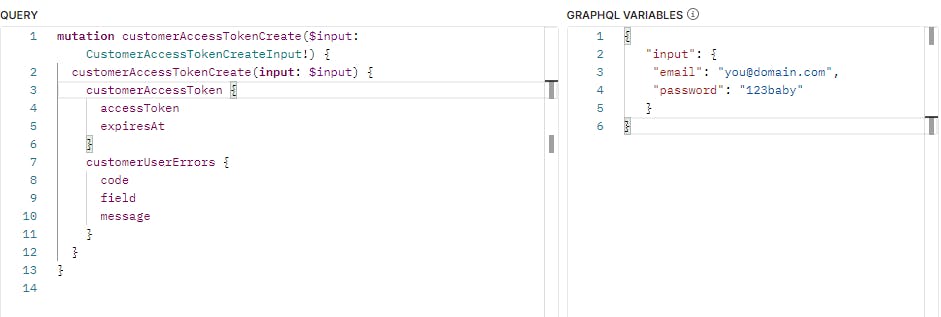
A little copy pasting and we have our hard-coded graphql query. For this post I will leave it hard-coded but you can easily adapt this to accept your parameters:
var graphQl = new {
        Query = @"mutation customerAccessTokenCreate($input: CustomerAccessTokenCreateInput!) {
                customerAccessTokenCreate(input: $input) {
                customerAccessToken {
                    accessToken
                    expiresAt
                }
                customerUserErrors {
                    code
                    field
                  message
                }
            }
        }
        ",
        Variables = new
        {
            Input = new
            {
                Email = "you@domain.com",
                Password = "123baby"
            }
        }
    };
Last, we just need to make the request and test it out. Please note you'll want to add appropriate error checking and in a real-world scenario use the IHttpClientFactory to create the HttpClient.
var client = new HttpClient();
client.BaseAddress = new Uri("https://yourdomain.myshopify.com/api/2022-01");
client.DefaultRequestHeaders.Add("X-Shopify-Storefront-Access-Token", "storeaccesstoken");

var graphQl = new {
        Query = @"mutation customerAccessTokenCreate($input: CustomerAccessTokenCreateInput!) {
                customerAccessTokenCreate(input: $input) {
                customerAccessToken {
                    accessToken
                    expiresAt
                }
                customerUserErrors {
                    code
                    field
                  message
                }
            }
        }
        ",
        Variables = new
        {
            Input = new
            {
                Email = "yourcustomer@domain.com",
                Password = "123mypass"
            }
        }
    };
    var authenticated = await client.PostAsJsonAsync("graphql.json", graphQl);
    var result = await authenticated.Content.ReadFromJsonAsync<CustomerAccessTokenCreateResponse>();
if (result.IsAuthorized)
{
   // await SetupUser();
}
Now we can confirm this customer's authentication credentials in Shopify and then set them up in our system with the same username and password for a seamless experience. Time permitting I will post complete examples @ Github.